Adding a touch of gold to your wooden furniture can elevate its look from simple to stunning. Gold accents bring warmth, sophistication, and a hint of luxury, whether you're aiming for a subtle shimmer or a bold statement. This comprehensive guide covers everything you need to know about using gold paint to enhance your wooden furniture, from preparation to application and design ideas.
Why Choose Gold Accents for Your Wooden Furniture?
Gold accents are more than just a trend; they're a timeless way to add personality and elegance to your living space. Here's why incorporating gold paint into your furniture projects is a fantastic idea: Versatility: Gold complements a wide range of wood tones, from light oak to dark mahogany. It pairs beautifully with both cool and warm color palettes, making it a versatile choice for any room. Visual Appeal: Gold paint reflects light, creating a sense of depth and dimension. It can highlight intricate carvings, draw attention to specific design elements, and add a touch of glamour to even the most basic furniture pieces. Customization: You have complete control over the intensity of the gold accent. Whether you prefer a subtle dusting or a bold, metallic finish, you can achieve the desired look with the right techniques and products. Upcycling: Gold accents are a great way to breathe new life into old or outdated furniture. A little bit of gold can transform a tired piece into a stylish focal point.
Essential Materials and Tools
Before you start painting, gather all the necessary materials and tools. This will ensure a smooth and efficient process.
Gold Paint: Choose a high-quality gold paint specifically designed for wood. Options include: Acrylic Gold Paint: Water-based, easy to clean, and suitable for most furniture projects.
Oil-Based Gold Paint: Durable and provides a rich, lustrous finish, but requires more time to dry and mineral spirits for cleanup.
Metallic Gold Spray Paint: Convenient for quick coverage and hard-to-reach areas, but requires careful application to avoid drips and unevenness.
Gold Leafing: While not paint, gold leaf offers the most authentic and luxurious gold finish, but it's more complex and time-consuming to apply. Primer: A good primer is essential for adhesion and preventing the gold paint from soaking into the wood. Choose a primer compatible with both your wood and the gold paint. Topcoat/Sealer: A clear topcoat will protect the gold paint from scratches, fading, and wear. Opt for a water-based or oil-based polyurethane sealer, depending on your paint type. Sandpaper: Various grits (120, 220, and 320) for smoothing surfaces, removing old finishes, and creating a better grip for the paint. Tack Cloth: To remove dust and debris after sanding. Painter's Tape: To mask off areas you don't want to paint. Paint Brushes: High-quality brushes in various sizes for detailed work and larger surfaces. Consider using foam brushes for a smooth, streak-free finish. Paint Tray: To hold the paint and prevent spills. Drop Cloth: To protect your work area from paint splatters. Safety Gear: Gloves, safety glasses, and a respirator (especially when using spray paint or oil-based products).
Step-by-Step Guide to Applying Gold Paint
Follow these steps for a professional-looking gold finish on your wooden furniture:
1. Preparation is Key
Proper preparation is crucial for achieving a flawless finish.
Clean the Furniture: Remove any dirt, dust, grease, or wax from the surface. Use a mild detergent and water solution, followed by a thorough rinse and drying. For antique furniture cleaning, use specialized cleaners designed to protect delicate finishes. Repair Any Damage: Fill any cracks, holes, or imperfections with wood filler. Let it dry completely and then sand it smooth. For furniture repair involving loose joints or broken parts, use wood glue and clamps. Sand the Surface: Sand the entire surface with 120-grit sandpaper to remove any existing finish and create a slightly rough surface for the primer to grip. Then, smooth it out with 220-grit sandpaper. For antique furniture, be gentle and avoid sanding too aggressively. Remove Dust: Use a tack cloth to remove all sanding dust. This is essential for preventing imperfections in the final finish. Tape Off Areas:Use painter's tape to mask off any areas you don't want to paint, such as edges, hardware, or other design elements.
2. Apply Primer
Choose the Right Primer: Select a primer that is compatible with both your wood type and the gold paint you've chosen. Apply a Thin, Even Coat: Use a brush or sprayer to apply a thin, even coat of primer to the entire surface. Avoid drips and runs. Let it Dry Completely: Allow the primer to dry completely according to the manufacturer's instructions. This is crucial for proper adhesion. Lightly Sand Again: Lightly sand the primed surface with 320-grit sandpaper to smooth out any imperfections. Remove dust with a tack cloth.
3. Apply the Gold Paint
Stir the Paint Well: Before using the gold paint, stir it thoroughly to ensure even distribution of the metallic pigments. Apply Thin Coats: Apply thin, even coats of gold paint, allowing each coat to dry completely before applying the next. Multiple thin coats are better than one thick coat, which can lead to drips and unevenness. Use the Right Brush: Use a high-quality brush or foam brush to minimize brushstrokes. For spray paint, hold the can about 10-12 inches away from the surface and use smooth, even strokes. Allow Sufficient Drying Time: Follow the manufacturer's instructions for drying time between coats.
4. Protect with a Topcoat
Choose a Compatible Topcoat: Select a clear topcoat (polyurethane) that is compatible with your gold paint. Test it in an inconspicuous area first to ensure it doesn't react negatively with the gold paint. Apply Thin, Even Coats: Apply thin, even coats of the topcoat, allowing each coat to dry completely before applying the next. Lightly Sand (Optional):After the first coat of topcoat has dried, you can lightly sand it with 320-grit sandpaper to smooth out any imperfections. Remove dust with a tack cloth before applying the final coat.
Design Ideas: Where to Use Gold Accents
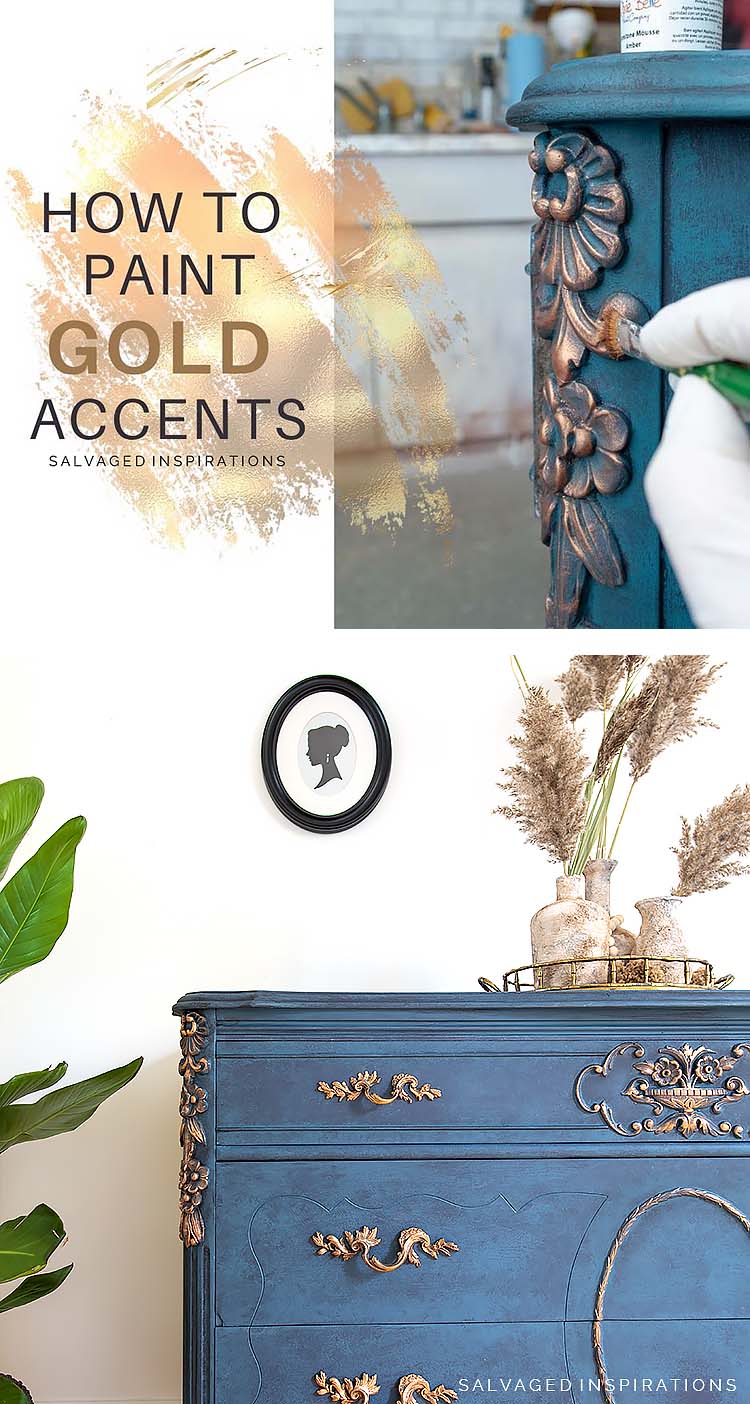
Here are some creative ways to incorporate gold paint into your wooden furniture: Highlighting Carvings: Use gold paint to accentuate intricate carvings on headboards, dressers, or chairs. This will add depth and visual interest to the piece. Edge Detailing: Paint the edges of tables, drawers, or shelves with gold for a subtle yet elegant touch. Legs and Feet: Transform plain wooden legs or feet into glamorous accents by painting them gold. Hardware Updates: Replace existing hardware (knobs, pulls, hinges) with gold-toned hardware, or paint your existing hardware for a quick and easy update. Stenciled Designs: Use stencils to create gold patterns or motifs on furniture surfaces. Distressed Finish: Apply gold paint and then lightly sand it back to reveal the wood underneath for a rustic-chic look. This technique works well with antique furniture and adds character to modern pieces. Two-Toned Furniture:Paint the main body of the furniture in a solid color and then use gold paint for the details, such as drawer fronts, door panels, or trim.
Maintaining Your Gold Accents
To keep your gold accents looking their best, follow these maintenance tips: Dust Regularly: Use a soft cloth to dust the furniture regularly. Clean Gently: Clean with a mild detergent and water solution when necessary. Avoid harsh chemicals or abrasive cleaners. Avoid Scratches: Protect the surface from scratches by using coasters, placemats, and felt pads under decorative items. Touch Up as Needed: If the gold paint becomes chipped or scratched, touch it up with a small amount of paint.
Troubleshooting Common Problems
Uneven Coverage: Apply multiple thin coats of paint, allowing each coat to dry completely. Brushstrokes: Use a high-quality brush or foam brush and apply the paint in long, even strokes. Drips and Runs: Avoid applying too much paint at once. If drips occur, sand them smooth after the paint has dried and then apply another coat. Paint Not Adhering: Ensure the surface is properly cleaned, sanded, and primed. Gold Paint Turning Green:This can happen with some metallic paints due to oxidation. Apply a clear topcoat with UV protection to prevent this.
Eco-Friendly Alternatives
If you're concerned about the environmental impact of your furniture projects, consider these eco-friendly alternatives: Water-Based Gold Paint: Water-based paints are low in VOCs (volatile organic compounds) and are a more sustainable choice. Reclaimed Wood: Use reclaimed wood for your furniture projects to reduce the demand for new lumber. Natural Finishes: Consider using natural oils or beeswax polish instead of synthetic topcoats. Milk Paint: Milk paint is a natural, non-toxic paint option that can be tinted with metallic pigments to create a gold finish.
By following these tips and techniques, you can confidently incorporate gold paint into your wooden furniture projects and create stunning, personalized pieces that reflect your unique style. Remember to always prioritize safety and take your time to achieve the best possible results. Whether you're updating a single piece or transforming an entire room, gold accents are a fantastic way to add a touch of luxury and sophistication to your home.